
This is about “bud grafting”, the easiest style of tree grafting. This article is for you if you want bud grafts that Just Work.
Briefly, bud grafting is grafting of an individual bud, which ultimately grows out to become a limb, or even an entire tree. You would do this to add a pollenizer, increase the number of varieties, or various other uses we will discuss at the end.
There are many variations of bud grafting, but I am going to show you the most foolproof. I’ll describe materials and methods you can use without a lot of practice. I will have you do it at the time of year that works best. I’ll point you to tools and supplies that are easy to get, without a lot of cash outlay.
Most of the narrative will be about why each particular point is the Easiest Way, and how you can, uh, make things more difficult and iffy if you really want to!
Safety first.
When I’ve taught grafting classes, some participants refused close-up glasses — and it was obvious they couldn’t see a thing. I have good vision, but when grafting I’m asking my eyes to see nearly microscopic detail. There’s no pride involved. You have to see what you’re doing. The sharp cutting tools are hazardous enough, without fumbling for focus.
Reading glasses are the easiest solution. My preference is high-powered ones, rated +3.00, and skinny lenses. That way, I can look over them when I want normal vision. For the crux of grafting, I don’t want normal vision. I want super close up vision.
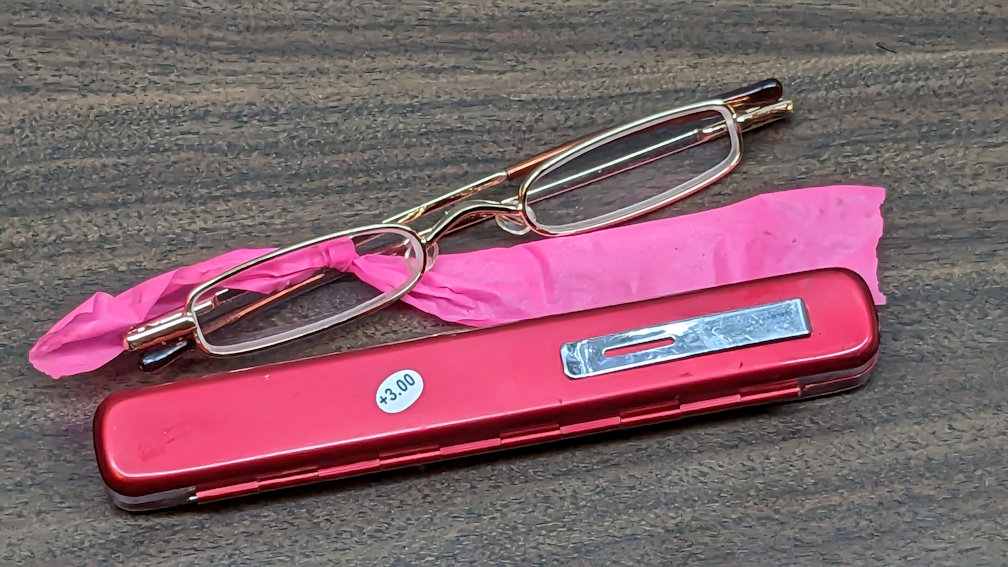
Reading glasses
In the picture, the pink flagging ribbon is for… Well, have you ever been up in a tree, and dropped something? On the ground, small things vanish in the grass and leaves.
When
Do your bud grafting the second week of July (That’s for the northern hemisphere. Six months different in the southern hemisphere).
First of all, this is about “T-budding”. Another variant is “chip budding”, but I am not going to talk about that because it is more difficult. Remember, I am giving you the Easy Way, that will Just Work.
T-budding requires that the bark of the stock will “slip”, which means to peel off easily and cleanly.

Bark that “slips”
Think of a banana. You can just pull the skin off, once you get it started. It naturally comes loose at a definite layer. Unlike an apple, where you have to cut the skin away to separate it from the flesh.
In these terms: For a banana the skin will “slip”. For an apple, it won’t.
A tree will be in this state while it is actively growing, from spring to some time in summer. What’s going on is this:
You know that you can count the rings in a tree stump to see how many years old the tree was. Every branch and twig of a tree puts on one of these annual rings.
There is a layer of cells, the “cambium”, under the bark. During winter, these cells are dormant. When a tree “wakes up” in spring, these cells start to multiply. The cambium cells that are against the wood change into more wood fibers, and this builds the annual ring. But while they are dividing, the cells are thin-walled and soft.
If you try to peel a twig at this time of year, the bark easily comes off. This is because the delicate cambium cells break. They are the physically weak layer between the tougher bark and wood.
In mid-latitudes, a tree typically goes into this bark-will-slip state the second week of April. It stays in this state while the tree is building the new layer of wood.
Various factors, such as drought stress, effect when the cambium goes dormant, and therefore transitions to the state where the bark will no longer slip. In severe stress, this may occur before the end of July. A particularly favored and well-watered tree may keep building wood fibers into September.
So, technically, you might be able to do T-budding for this longer time period. But, remember, I’m telling you the Easy Way.
The Easy Way is to take scions (the part you graft), right when you do the grafting, without having to store them, or other fuss.
The scion for a bud graft is simply a single bud, sliced off with a small piece of bark. We’ll cover how you do that later. The point for making this Easy is that, early on, there are no such buds to use.
In spring, when the bark first slips, the old buds are all opening out, and the new buds are not yet formed. As shoots lengthen and leaves expand, new buds develop at the bases of leaves. However, it takes a while for these buds, and the tissue supporting them, to firm up.
You can make yourself crazy, trying to slice off delicate half-formed buds, and insert them on soft immature twigs. But I’m telling you the Easy Way. Wait till the second week of July. That’s the sweet spot.
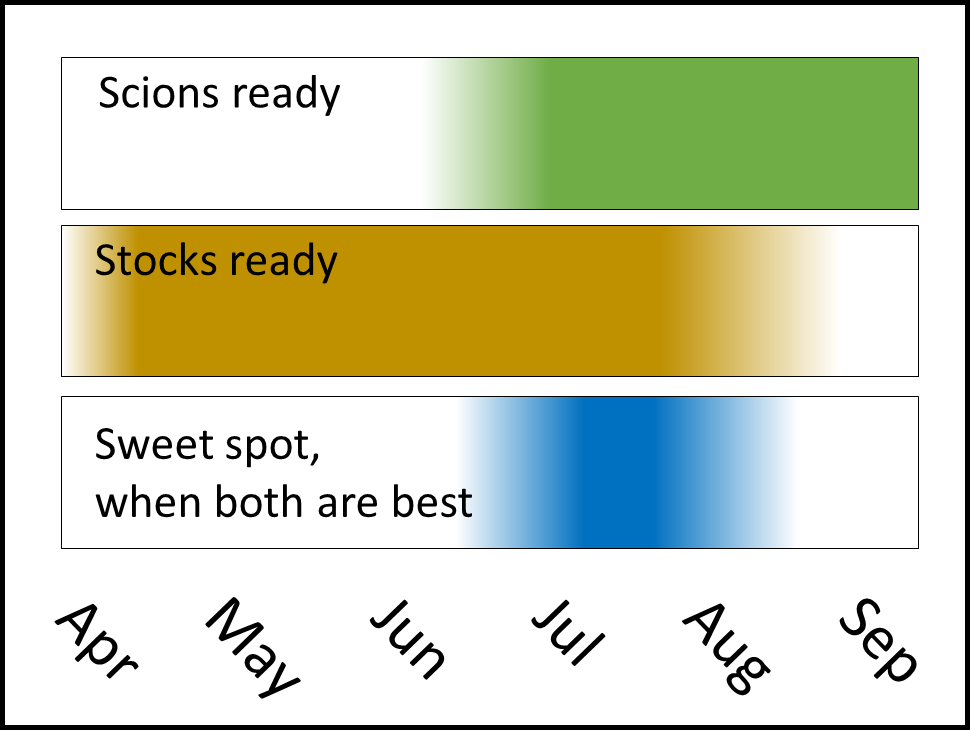
The sweet spot time
If you want to take more trouble, you can keep winter twigs dormant, under refrigeration, and graft those buds as soon as the stock bark will slip. That’s a variant, but let’s keep on with the Easy Way.
Use a sharp knife.
A simple utility knife is fine, with a new sharp blade. You do not need any special “grafting knife”. I’m assuming you are new to this, and you want it to Just Work.
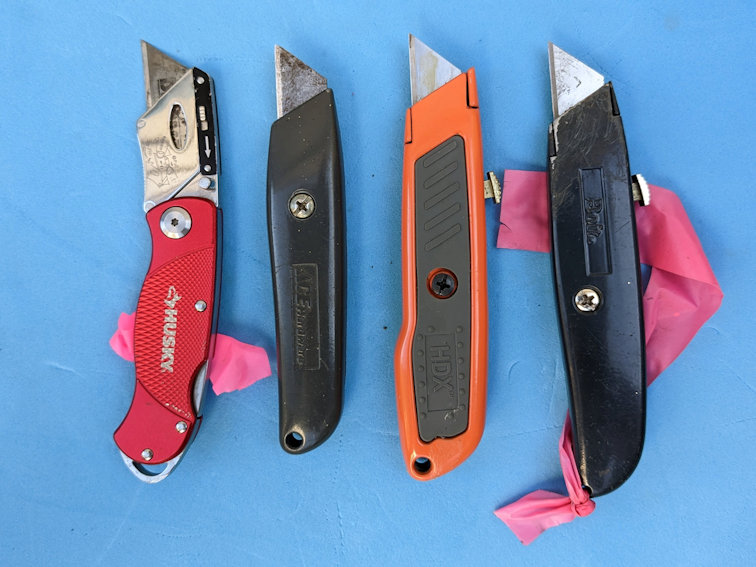
Utility knives
The various kinds of utility knife take standard replaceable triangle pointed blades. You may well already have a knife like this. If so, all you need to get is new sharp blades.

Utility knife blades
If you are the kind of person who has to have all the cool equipment, sure, spend $30 on a grafting knife you will never use again. But see if you can tell any difference in results from the utility knife you probably already have.
Do use a new sharp blade, though.
In a pinch, you can try grafting with a pocket knife, or your grandpa’s old Bowie knife. But you want a blade that can easily slice into a twig, accurately and paper thin. You better sharpen that edge up to a razor hone. Or, the Easy Way. Use an ordinary (new) utility knife blade, which is already razor sharp.
Any kind of utility knife will work but be aware of one thing. If it has a retractable blade, the edge may contact metal as it slides in and out, and slightly dull itself. So, put in your new sharp blade, and don’t retract it. No need to compromise the edge.
If you are going to go get a utility knife, the best for grafting is a folding one, but configured so the blade does not contact anything (to dull itself) when closed. Folding means you can put the knife away without the sharp blade exposed.

Folding utility knife
Choose your stock.
The “stock” is what you are going to graft onto.
The Easy Way is to graft onto a pencil-thick twig of the current season’s growth. Remember, it’s now the second week of July. Shoots have been growing since spring. They are now long twigs, and they still have their leaves.
You can sometimes get away with bud grafting onto older twigs and branches. But the bark is stiffer and thicker, and the cambium may go dormant earlier. Let’s stick to the Easy Way.
It’s possible to bud graft onto thinner twigs. If you are good at delicate work, go for it. The method is the same. But I’m continuing on with the Easy Way.
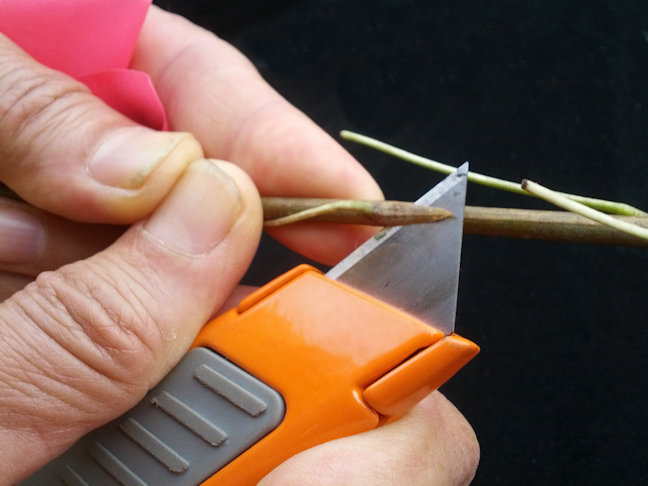
You are going to make a T-shaped cut in the stock twig. Practice this a few times, perhaps on a pruned-off twig. There are a few details to get the feel for.
Choose a clear area between buds. You don’t need to line up any of the cuts with existing buds, they just get in the way.
Start by gently cutting the tip of your knife into the twig bark.

Start cut
Draw the tip downward in a straight cut. You do not need to press hard or dig into the wood. The new bark is as easy to cut as paper. Make the slice about an inch long.
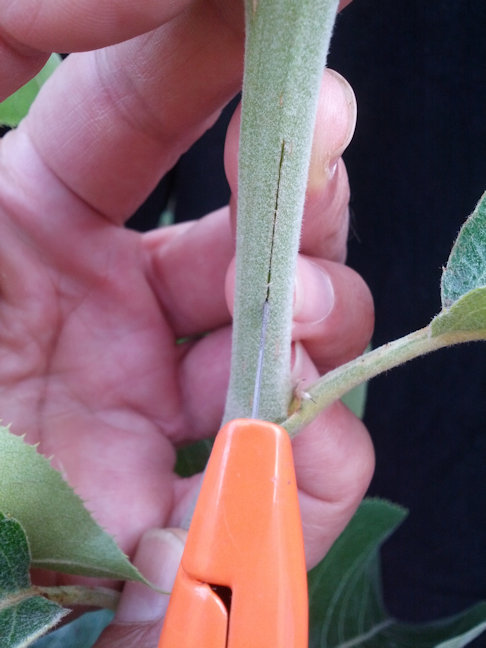
Vertical cut
Next, place your blade across the twig, lined up with the top of the first cut. Press into the twig to cut through the bark, and gently “roll” the edge across the top of the first cut. This completes the top bar of the T-cut.
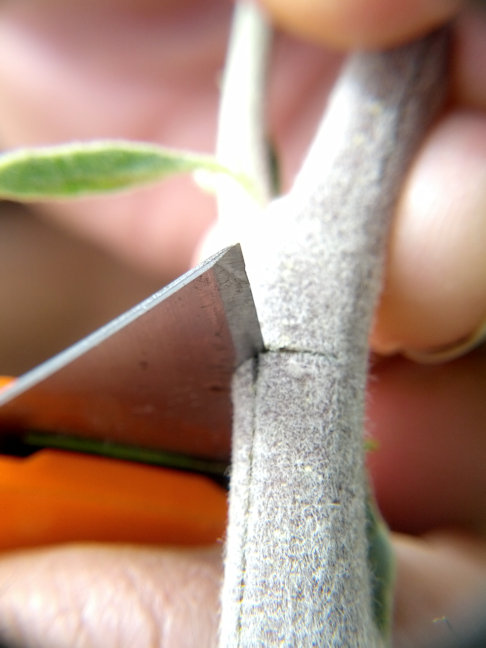
Top cut
Now, using the tip of your knife, push the “ears” of the T-cut open.
Spread “ear”
This means to peel back the flaps now formed by the sides of the T. You should not need to gouge into the twig. Just a light push from the center line outward, and the bark should pop loose.
If it does not, something’s wrong, and T-budding will not work. The bark will not “slip” like this at the wrong time of year, such as winter when the bark tightly adheres.
You do not need to peel back far. Only far enough to slip in a bud scion, which we will practice next.
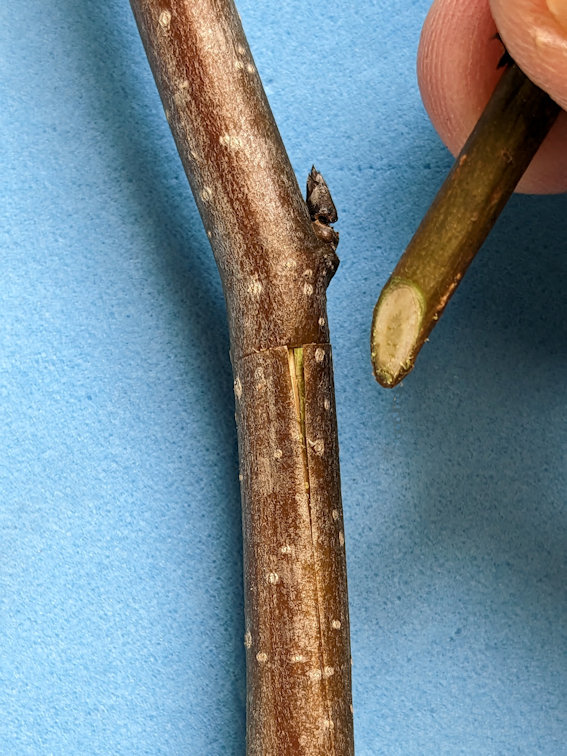
Choose your scion.
The Easy Way is to cut your scions at the same time you are going to graft them. Some species, like persimmons, are problematic to keep viable for long.
To make scions, you are going to slice off small “shields” of bark, each one with a bud in the center. You are going to tuck these down into the T cuts.
Now, here’s a point that might not be obvious if you are at your bud source, and not looking at the stock. It will be easy to slip smaller into bigger, but not bigger into smaller. You do not necessarily want the thickest source twigs.
It does not matter how small the scion bud is, as long as it’s healthy. You are setting things up so all the strength of the stock will make the scion bud grow. But the scion itself can be small. Choose scion twigs that are the same diameter as the stock, or thinner.
If the scion twigs are very long, you can cut them to convenient length. The lower part of the twig is usually best, as its buds have had the most time this season to mature.
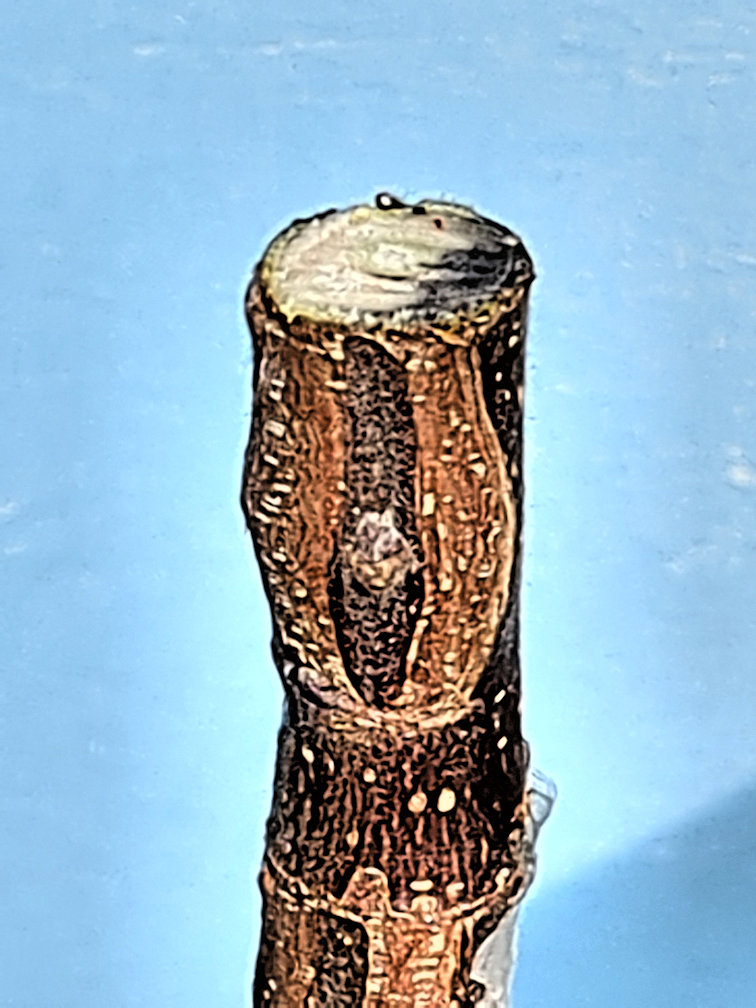
A bud looks like a small nodule on the twig, at the base of a leaf stalk. The exact appearance varies for different kinds of plants, but the bud will be in the same position. The photo below is a bud of pear.

Example bud
Generally, there will be a bud at the base of most leaves. The very lowermost leaves may not have buds. The very outermost tip of the twig may have immature buds, or that part of the twig may be too thin to easily use.
Some plants, such as certain varieties of roses, skip having buds at a lot of the leaves. Check and make sure you take a part of the twig that has buds.
Sometimes, such as in your back yard, you may simply step from the scion source right over to the stock. Often, however, you will be transporting scion some distance, perhaps a drive across town. Here’s how to keep the buds viable.
Clip off a scion twig, and then cut off all the blades of the leaves.

Cut off leaf blades
In the normal course of plant life, the broad flat blades of leaves are giving off water vapor, “trading” it for carbon dioxide from the atmosphere. But now, for these scions, that game is over. The leaf blades will only lose precious moisture. The leaf stalks, however, can be convenient handles for inserting the buds into the T cuts later.

Budstick
This twig, denuded of its leaf blades, is called a “budstick”. The collective material is called “budwood”. If possible, get some extras for practice, or use similar twigs from the stock for practice.
You want to retain hydration in a budstick. It’s not necessary to put the cut end in water, but treat it like any other wilt-prone produce. Put it in a plastic produce bag.

Bag budsticks
A few drops of water in the bag will retain hydration. You don’t need much. If you put your hand in a plastic bag, shortly it will feel damp and humid. The slight moisture from your skin creates 100% humidity, and a few drops of water do the same. In such an atmosphere, your budsticks can’t dry out.

Moisture for budsticks
Keep the bag in the shade. If you are driving, watch that the bag is not baking in the sun, coming in through the car windows. This may seem like a trivial point, but plant material can roast in an enclosed bag, even with air conditioning on. Somehow, it’s easy to get the impression, with all that cooling air breezing past outside the car, something inside can’t be collecting heat. But it can.
Keep budsticks out of the sun
If there will be any significant time delay before grafting, refrigerate budwood if at all possible.
Now comes the step of cutting “bud shields”, the shield shaped pieces of bark, each holding a bud. Part of keeping this Easy, is not to cut yourself! A knife sharp enough to “melt” through the twig is safer. If it’s so dull you have to force it, it will slice you when it gives way.
In all of this, keep vigilant how you are holding your fingers. Always do things in such a way that, not “if” but “when”, the knife slips, it can not cut you.
You may see online videos of experienced grafters blithely slicing away, reckless and quick. You do not need to do that. The final product is what you’re going for. Safety first, even if it takes you ten times as long.
Cutting bud shields is an operation you should practice a few times before doing it for real.
Begin cut
Start slicing into a twig at a shallow angle, a short distance below a bud. The distance will come with practice.

Cut completed
You want to raise a thin strip of bark, from below the bud to above it, that barely includes some wood. You want the cut surface as flat as possible, for maximum close contact inside the stock twig.
Bud shield raised
One thing that will become evident is that there is a slight “shelf” of wood just below a bud, more or less pronounced in different species. Typically, on first try, your knife edge will jam against this shelf, then break through — slicing the bud in half and ruining it. A few times of practice, and you will get the feel of how to compensate.
Rather than force, use finesse. You can rock the knife blade from side to side, laying slightly more pressure first to the right then the left. If you find it gives you more control, you can draw the blade across the cut, like a saw. Conceptually “melt” the blade through, rather than guillotine.
Avoid touching the cut surface of the bud shield. If you have left the leaf stalk attached, you can use it as a handle. You can also continue your cut considerably above the bud, leaving a long tail of bark for a handle. As you will see, this upper tail part will be removed.
Bud shield
You may see demonstrated a technique of leaving the bud shield attached to the budstick by a tail at the top, then simply pushing the shield aside to slip it down into the T cut. This is high elegance, and comes from long practice. You do not need to aspire to that. Handle the bud shield any way you want, including by tweezers, but do avoid touching the cut surface.
A few times of practice will be valuable. With the ears of the T-cut slightly raised, push the bud shield down inside. You may need to ease the sides of the T-cut apart further down.

Guide in
By analogy, you are trying to push something in under the split peel of a banana. There should not be much friction, but there will be some. If the leaf stalk is still attached, you can use it to put force on the bud shield. Use your fingers, or the dull back of your knife.
If the leaf stalk is gone (or comes off), you can push with the sharp tip of your knife, by digging slightly into the leaf scar.
Push with knife tip
Do whatever works, including tweezers.

Can use tweezers
Or you might try again, cutting a bud shield that is thicker, and therefore more stiff.
If the sides of the T cut are slightly recalcitrant to open, you can gently “ream” them apart using a tool you make from a small twig. Use a twig of the same species you are grafting.
Can cut a reamer
Slice the twig end at an angle (experiment with how steep an angle). Push the end down the T-cut to open it before slipping in the bud.

Reamer
A twig reamer like this should be an aid, to loosen slightly tight bark, not a substitute for the bark being in the wrong condition. If the bark tears and shreds, the plant is not in the right stage for T-budding.
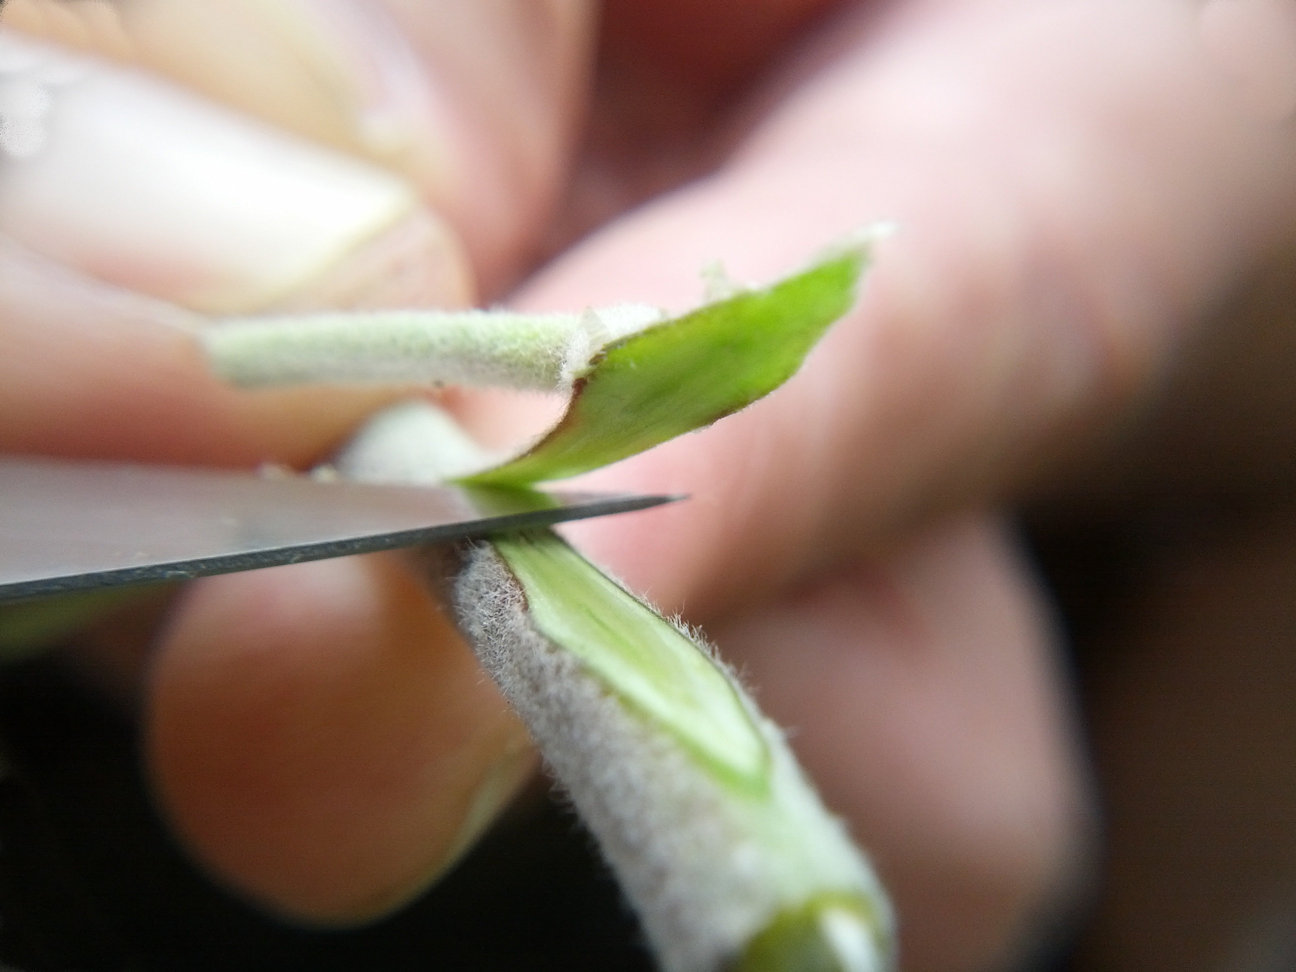
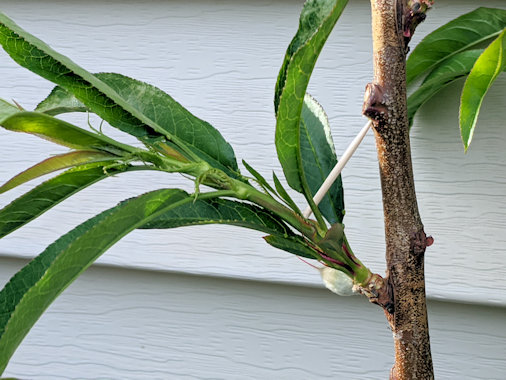
Some species of fruit tree have a membrane-thin skin on the twig. In this example, showing a peach twig, notice that the bud shield is going in inside the bark, about a millimeter deep, not just inside that clear skin.

Cuticle vs. bark
This cuticle is thin like cellophane. Some people have confused it with the bark because it often peels back on its own. But the bark you want to peel is a thickness similar to the knife blade itself.
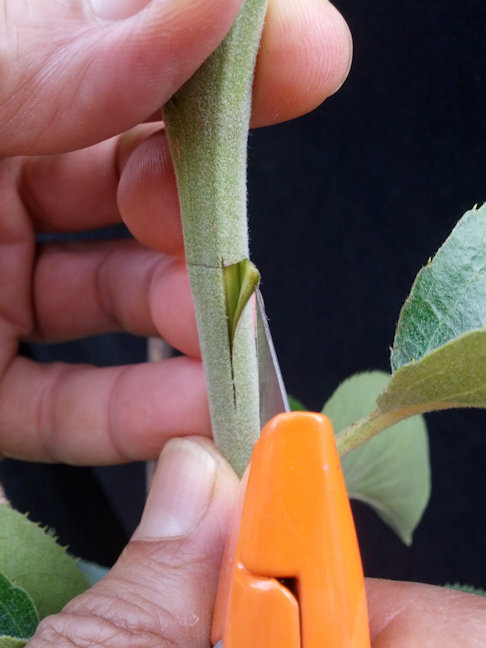
After you have the bud shield in, roll your knife across the top bar of the T to cut off the excess tail of the bud shield.

Cut the tail
Here is another view of the membrane skin, on a cherry twig, to show the bud shield inserted between the correct layers.

Cuticle vs. bark
You may see demos where the grafter puts the bud shield in his mouth “to keep it wet”, or licks it for some extra lubrication. These grafters have not heard the research that this decreases the percentage of success.
Your saliva is not water. It contains starch digesting enzymes, and other substances deleterious to plant tissues. A bud graft may survive such treatment, but it’s better off without. If you work deftly, which you will after a few tries, there is no significant drying out.
If you look at the back cut surface of the bud shield, you may see a small slip of wood behind the bud, or you may not. The graft works about as well with it or without. What’s important is that you sliced deep enough so the bud shield is sufficiently stiff to easily slide down the T cut.
With the bud shield in place, remove the leaf stalk, if it’s still there.
Break it off, if it will easily snap.

Snap the leaf stalk
If it won’t, carefully slice it off near the base with your knife. It may work best to make the cut backed by your thumbnail.

Or cut the leaf stalk
A few times of practice, and you can do it without prying the bud shield out of the T cut, or cutting through the bud.
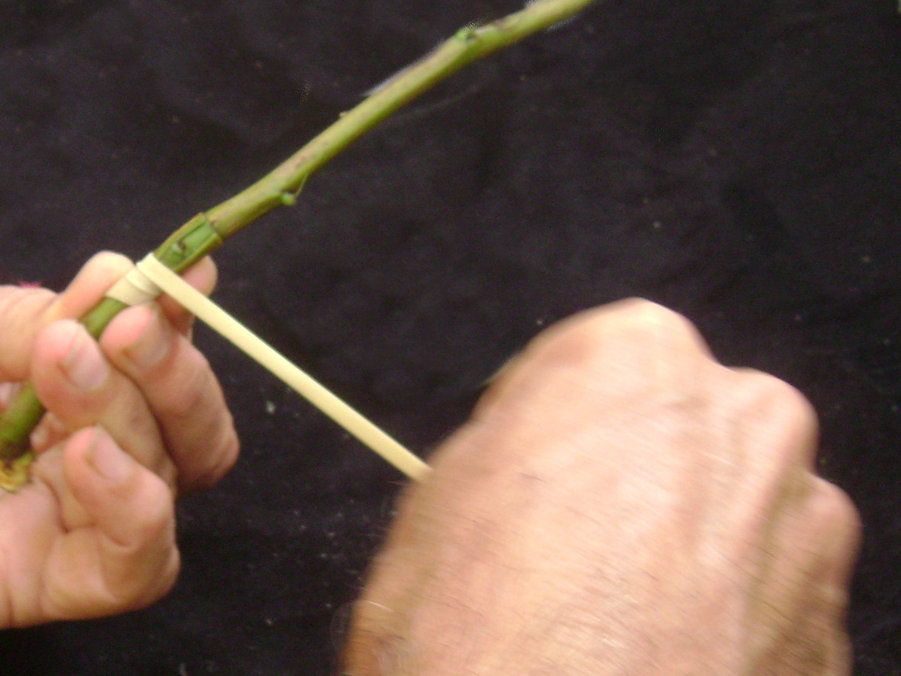
Bind up the graft.
If you were to make a T cut, peeled back the ears, and then changed your mind, you could get the wound to heal very well by simply binding it up. Some of the delicate cambium cells were torn in peeling back the flaps, but there is still a layer of living cells on both the outside of the wood and the inside of the bark.
Bound up so they didn’t dry out, these cells would multiply till they filled in any space. Then, the physical pressure of being confined would signal them to resume turning into wood and bark. The wound would heal without much scar.

Bud in place
With a bud scion in place, the cambium cells on the surface of the wood multiply out towards the back of the bud shield. The bud shield itself also has exposed cambium, a “U” shaped track at the demarcation between its own bark and wood.
Sometimes, the tiny slice of wood falls out of the bud shield, but this is fine. Cambium is cambium, and now it’s an exposed patch.
Once the cambium cells have filled in all the space, the stock knits to the bud shield. The scion bud is now attached to the stock as if one of its own.
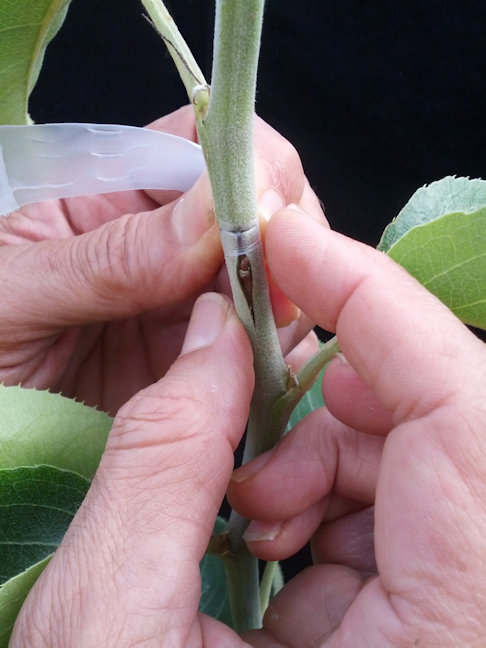
Begin wrap
You should wrap up the graft tightly. If not bound up, the edges of the T would dry and curl back, and the bud shield might fall out. But the binding should be tight for a more subtle reason. The multiplying cambium cells grow until they feel pressure. Then they turn into bark and wood.
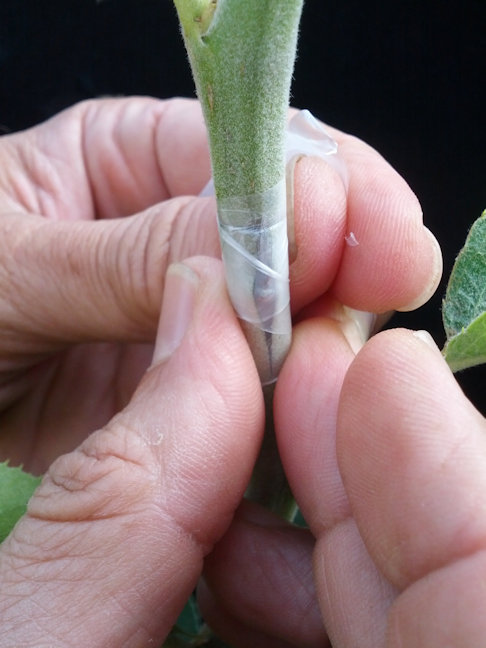
Wrap done
Sometimes, beginning bud grafters think they have to be “nice” to that poor little tender bud. So they loosely wad some covering around it. This does keep the cut from drying out. But the cambium cells keep multiplying and multiplying, and can even push the bud shield out of the T-cut.
No, you should bind the graft as tight as you can. A tree is made of wood. You’re not going to hurt it by wrapping too tight.
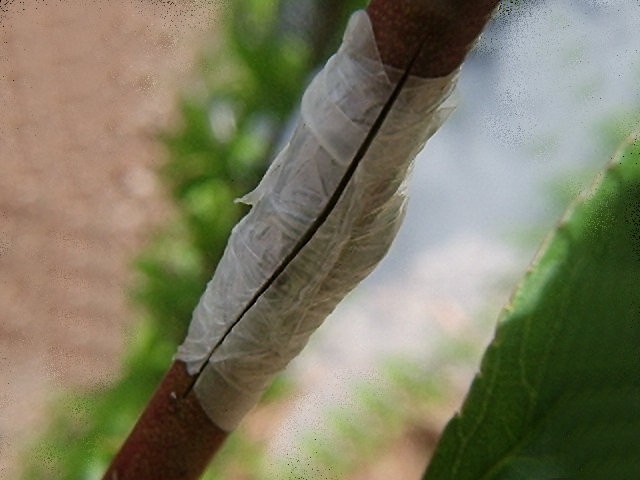
OK, here the “Most Easy Way” requires a specialized material, the only specialized materials for the whole process. The material is called “Parafilm”. But if you can’t get it, I’ll tell you what to substitute.
Parafilm is a stretch-and-seal film, originally developed for laboratories, such as to cover test tubes. It comes in a roll, like tape.
At some point, someone realized it was great for stretching and sealing over bud grafts. It’s waterproof, so it keeps the graft from drying out. It will stretch tight, so it exerts the desired pressure. It naturally starts breaking down in sunlight after a few weeks, when it has done its job. And, if left on, it’s stretchy enough that shoots can push right through, as buds begin to grow.
Parafilm naturally degrades
When the Parafilm company realized people were using it for grafting, they came up with a slightly different formulation that’s even more ideal for this purpose. But the laboratory grade works fine.
If you know someone who works in, say, a hospital lab, they can probably get you a few feet. It would be like asking for a handful of paper towels.
The best width for most bud grafting is a half inch. If you have Parafilm that’s wider, it would be worth your trouble to cut it to half inch width.
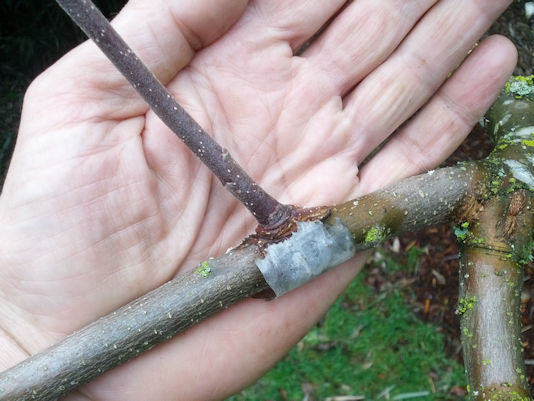
If you can’t get Parafilm, the two next most easy options are rubber bands and strips of plastic bag.
For a long time, the standard bud graft binding in nurseries was “budding rubbers”. These were like rubber bands, except as if you snipped open the ring to make a strip. Naturally, you can just snip a regular office rubber band to make a substitute. They were handy for mass production because rubber naturally biodegrades, so no need to go through the field later taking them off.
Rubber wrap
They are a notch down in Easy from Parafilm because there is a bit of a learning curve. You want to stretch the rubber tight, and then tie it so it stays. If you are a nursery worker, who has done it a million times, you can tie it in your sleep. However, first time, you will likely have some fumbling. Wrap over all cut surfaces of your bud graft, and stretch it nice and tight.
If for some reason you can’t get rubber bands, strips of polyethylene film will do. Plastic bags are polyethylene, so it’s just a matter of cutting strips. The easy way, rather than cutting a long line, is to roll one up, and then snip off a section of the roll.
Polyethylene is slippery, so this takes a little practice. Start by wrapping the strip around the twig below your graft, a few times until friction takes hold. Then, wrap upward, to cover your graft. Don’t worry, polyethylene is permeable to oxygen. You’re not going to smother your bud.
Finishing off above your graft is a trick. You have to pass the end of the strip under, to create a knot. But it works.
Since polyethylene is not so degradable as either Parafilm or rubber, you will have to take it off later. Within a few weeks, you will know if your bud graft has healed. Now, slice the polyethylene down the back side of the twig from your bud graft. You will probably cut into the skin of the twig, but this is minimal.
Slit non-biodegradable wraps
There are a few things it would be better not to use for binding bud grafts:
- “Saran” type food wrap. It’s not permeable to oxygen.
- Any kind of tape that has an adhesive side, such as electrical tape. When removed, it will end up pulling off at least the outer skin of the twig.
- Any fibrous tape, such as duct tape or cloth medical tape. It will not stretch as the twig grows thicker, and so it will strangle the graft.
Don’t paint bud grafts with liquid sealer. It would be redundant, after the wrap. And it could wick into the graft and interfere with healing.
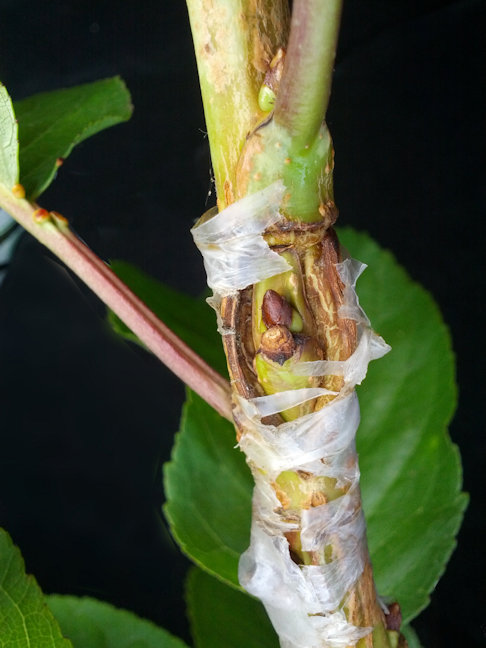
Wait till next winter or spring.
Now that you have your bud graft wrapped up, patience is key. Do nothing, absolutely nothing, until the following winter or spring.
Your bud graft is now playing the role of one of the stock plant’s own buds. These buds usually stay dormant all the rest of the growing season.
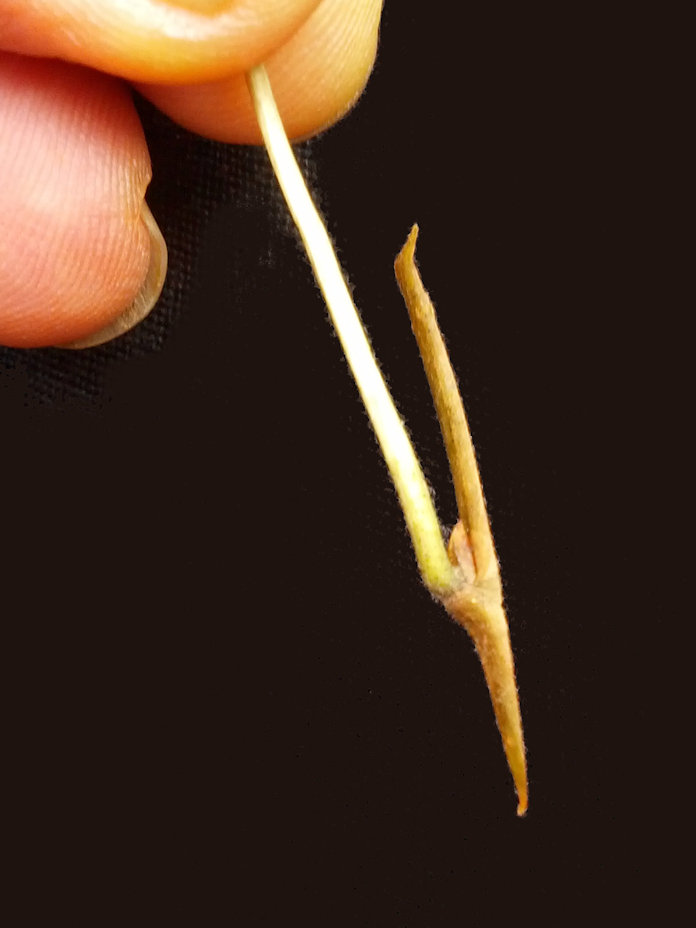
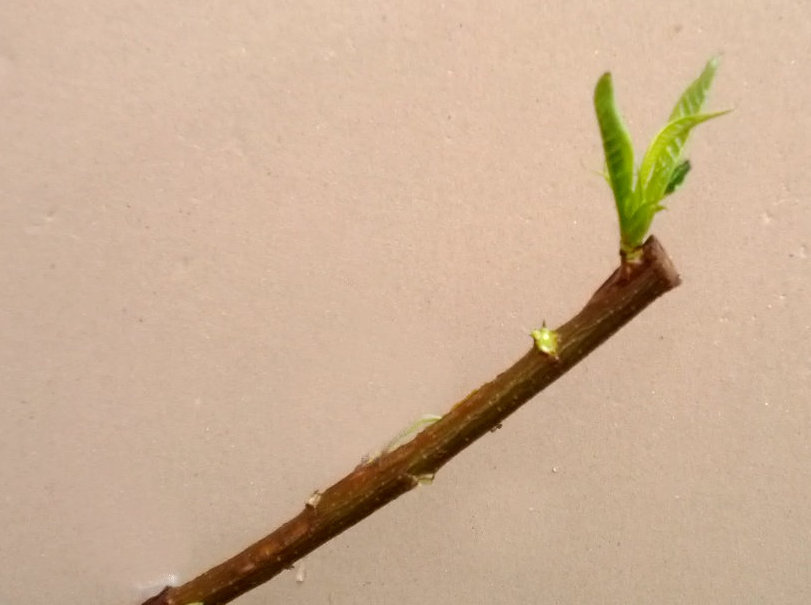
Occasionally, a bud graft will grow out into a shoot, the same as a stock’s own bud may do, but that’s its own business. This is shown below, and it is rare. Not part of the usual process.
Rarely, a bud will grow as soon as grafted.
It’s possible all the wrapping may have fallen off by winter. Still, it should be easy to see which buds are your bud grafts.
If the stock twig does not expand much, a grafted bud will be set in, looking much as it did when you put it there. The cuts may pucker somewhat, as the top cut of the “T” does in this pear bud grafted onto hawthorn.

Resting bud
If the stock twig has made considerable growth, the cuts may have stretched out as new bark, like these apple bud grafts.
Resting buds
When you prune a twig, you cut it back to just above a bud. Then, the maximum strength of growth can go into what is now that top bud.
This is how you induce your bud graft to grow, but not until the following spring. You cut back the stock twig to just above your bud graft. Then the grafted bud grows. Cutting across the top of what used to be the bud shield is about right.
Cut above
There are some variants of bud grafting where you do cut above grafted buds in the current season. But I am keeping this Easy. Those variants mostly involve grafting in spring.
It’s true, a bud graft will be healed within a few weeks. However, if you bud graft in July, wait a few weeks, and then cut off above, you might possibly get the grafted bud to grow. Far more likely, the twig will die back to below your bud graft, and your work will be for nothing. Or the bud may make some slight, weak growth, which is no advantage compared to simply waiting for the next dormant season.
I know this from experience. I experimented for a few years, trying to induce current season growth. The results had a very low rate of success. Let’s keep this Easy.
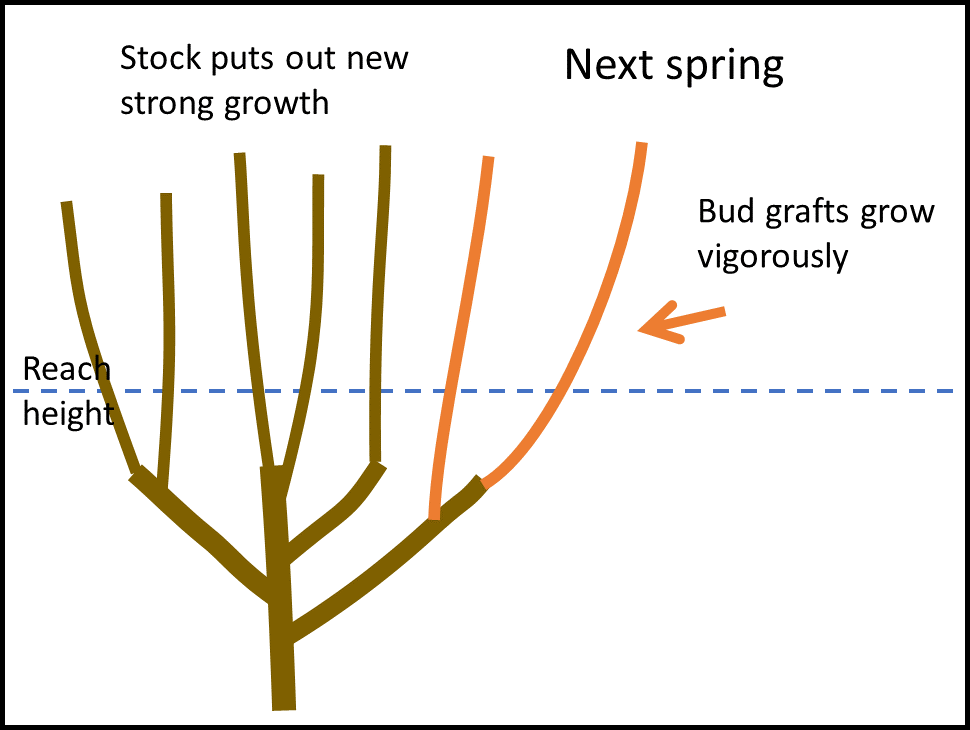
Next spring, as your grafted bud begins to grow, you need to break off all other growth from the stock. It can be hard to make yourself do this, killing all those other lush healthy sprouts.

Spring growth
If you don’t, however, your grafted bud will be suppressed. The stock twig’s own buds originally have a stronger connection, and will get a head start. If you do nothing, they will overwhelm your grafted bud.
Stock shoots rubbed off
At this stage, when buds are just leafing out, you can “rub off ” the unwanted ones. You just push them down or to the side from their bases. They will snap off, no tools needed. The shoot from your grafted bud will soon take up all the growing strength of the stock.
You may have to rub off the stock shoots two or three time to make sure all the growing strength goes into your grafted buds.
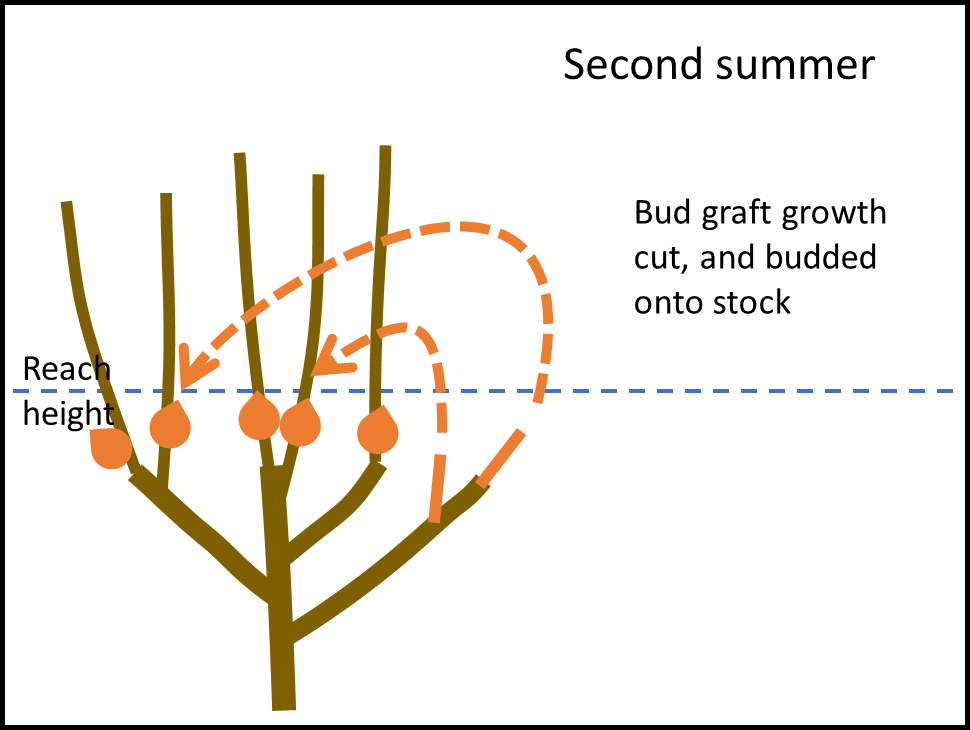
Up till now, I have talked as though you always put only one bud on each stock twig. There are various reasons you might do more. If you have enough budwood, you might add extras, for backup. You might put buds of different varieties, to ultimately have one branch of each kind.
Below is an example of multiple bud grafts. After a year’s growth, you can barely tell the shoots started as bud grafts.

Bud graft shoots
Look for the slight pucker left by the top of the T cut. This is easiest to see at the base of the lowermost shoot (detail below).

Shoot base detail
If the stock is vigorous, all of the grafts may grow out well. But suppose they are of different varieties? You want to make sure each one becomes a limb.
Below is an example of bud grafts that, for various reasons, the stock twig was never pruned off above. The stock grew for an additional year, but the bud graft growth was originally minimal.
Now, however, the bud grafts have been induced to resume development. How?
Induced growth
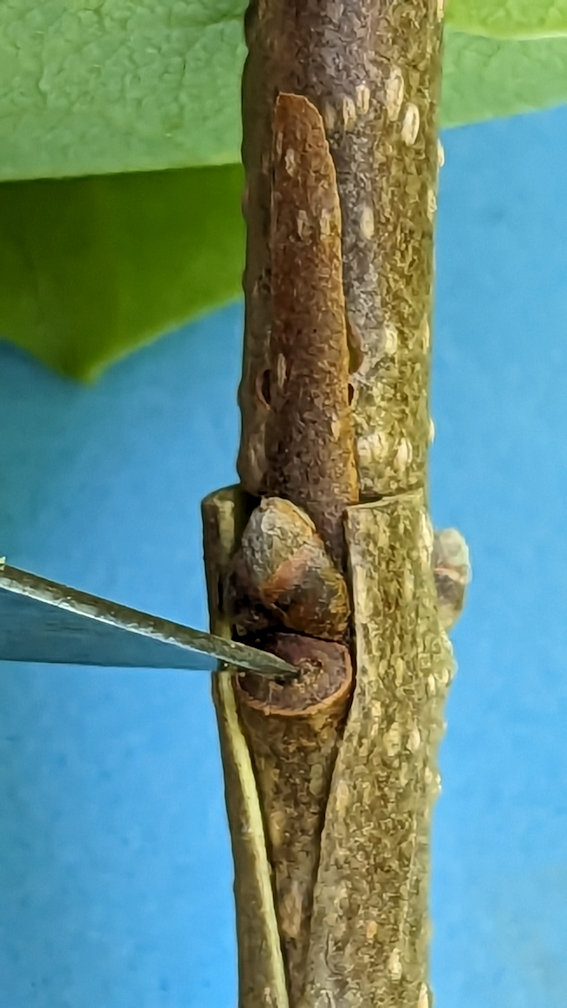
Notice in the detail photo below: Above the most vigorous shoot, which is marked at the base by yellow paint, there is a gap in the bark. If you look close, you can see the pucker from the T cut of the original graft, but that is not what this is. This is a scrape, made by a rasp, extending about a third of the way around the stock, and all the way through the bark.
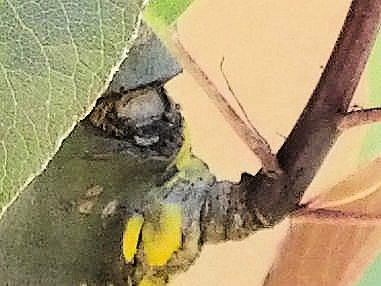
Detail of rasp cut
When you cut off a twig above a bud, that bud grows because its inhibition has been removed. That inhibition is a hormone called “auxin”, which the actively growing tip produces. The auxin travels down the twig, and inhibits the buds below from opening. When you cut off the twig, no more tip, no more auxin, and therefore no more inhibition.
You can simulate this by scraping through the bark above a bud. A thin knife-slit is not enough. You have to make a sizeable gap, and scrape off all the bark, right down to the solid wood. A rasp, or a round file, is one way to do it.
Then, the auxin traveling down the twig through the bark can’t get to this particular bud any more. And so the bud behaves as though it’s at the top, and grows.
You could control the growth on an entire tree this way, instead of pruning. But it’s not usually worth the trouble. However, it’s a handy trick when you want to make sure a certain bud grows.
Don’t worry. A gouge like this will heal up, usually within a year.
This example illustrates another issue of bud grafts, and how to solve it. Buds, when released from inhibition, can grow very vigorously upward. For the top bud, this is no problem. It’s growing out into open air. But shoots from lower buds may be nearly vertical, and form narrow angles to the stock.
Here is a doctored photo of the above shoots. The slim twig to the right doesn’t look like much now. However, left to grow, the red lines show how things will stand when both it and the stock have put on about a quarter inch more wood.

Future growth
Maybe it’s obvious to you that a side branch at such a narrow angle would easily pry off, say, under the weight of a full crop of fruit. Maybe you never thought about it, but it’s so.
The remedy is to spread this branch, now, while it’s still a tender twig. You can do it with a toothpick.
Poke the tip of the toothpick into the skin of the new shoot, and the other tip into the bark of the stock, to hold the new shoot out at an angle. This tiny wound in the bark does no harm. Think about the future, when that slim new shoot can have become as big around as your arm.

Toothpick spreader
I’ll leave it to you to do the visualization of when both these shoots have become thick limbs. Now you can see the angle they meet will be more like 45 degrees, sturdy and strong.
You can do this twig-spreading on any shoot, bud graft or no. If the space is very small, you can use a half toothpick.
Half toothpick spreader
Just break the toothpick in half, and whittle the broken end sharp. Spreaders like this seldom fall out except occasionally in strong windstorms. By then, they have likely done their job.
If for some reason you have a very large gap to span, you can use something like a bamboo skewer, available in kitchen supplies.
Uses of bud grafting.
Years ago, I lived at a farm where there were plum thickets. The leaves and blossoms looked like prune plum, but the plants never bore any fruit. So I was free to experiment grafting, nothing to lose.
The plum bushes spread by root suckers, new stems coming up along fencerows. I chose one of these that had grown into a branched shrub about shoulder height. In spring, I got ahold of a few long shoots of a good yellow plum I now know was ‘Shiro’. I cut this into scions, short sections of twig a few buds each. I grafted these all over the thicket shrub. (This was a different method than bud grafting.)
Of all those thirty-some grafts, only two took. I now know that Asian plums, of which ‘Shiro” is one, are iffy to graft in spring, at least without special techniques.
From below all the failed scions, the thicket shrub put out many strong shoots. That summer, I got another twig from the same ‘Shiro’ tree. I bud grafted from it onto the new shoots. This was much easier than the original spring grafting had been.
The following winter, I pruned off above these ‘Shiro’ bud grafts. When spring came, every single one of the ‘Shiro’ buds grew. They shot out explosively, up to three shoots from each bud. I wish I had pictures! Within a year, that thicket shrub had essentially become a ‘Shiro’ tree. As far as I know, it’s still there.
One surprising thing; that tree quit spreading by root suckers. I don’t know if this is typical, but it was as if the strong top “pulled up” strength into itself to produce plums, instead of just rambling underground.
This illustrated several things about bud grafting:
For many kinds of fruit, bud grafts are more reliable than other methods. Cherries, peaches, apricots, Asian plums, and some others exhibit a considerable percentage of failures when grafted in spring. For summer bud grafting, the success rate is practically 100%. It may be temperature, the healing tissues not as active in cooler spring weather. Whatever the reason, it’s consistent, and clear to anyone who does much grafting.
Bud grafting offers a “second chance” after other grafts fail. If you try other styles of grafts, and they do not work, look for shoots re-sprouting below to use for bud grafting the coming summer.
If you bring home a newly-grafted tree, and that graft fails, same thing. Encourage a sprout from below the dead graft, and you can bud graft onto it.
If you are new to newly-grafted trees, you may get conflicting advice: Whether to break off sprouts from the rootstock or not. It depends on whether the graft took.
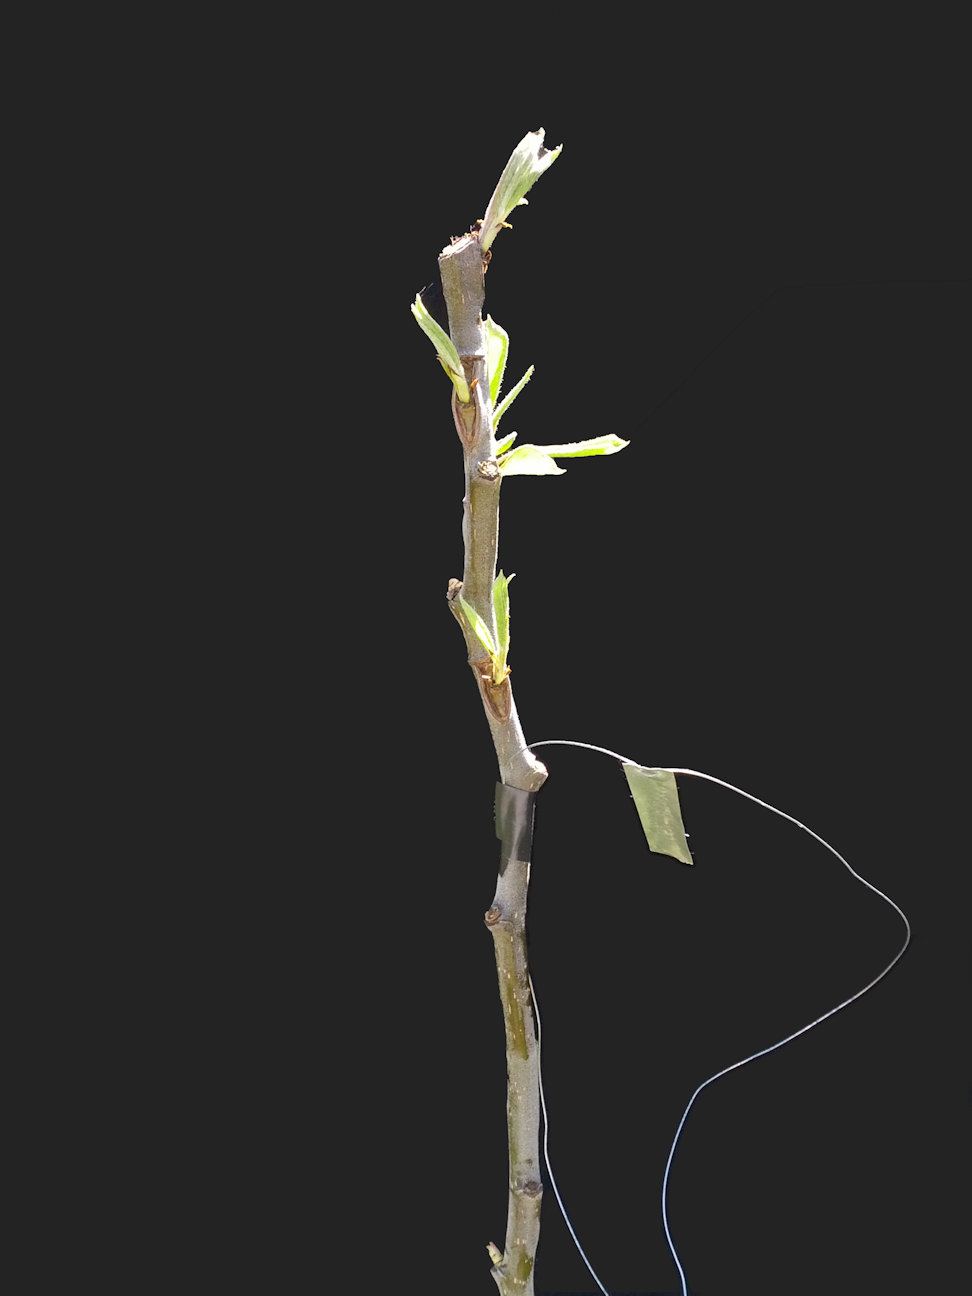
Both the following photos are in the month of May, about two months after the original grafts were done. That should be plenty of time to know if a graft took.
Below is an example of a new tree doing as desired. The grafted part is above the black tape. There is healthy new growth up top.
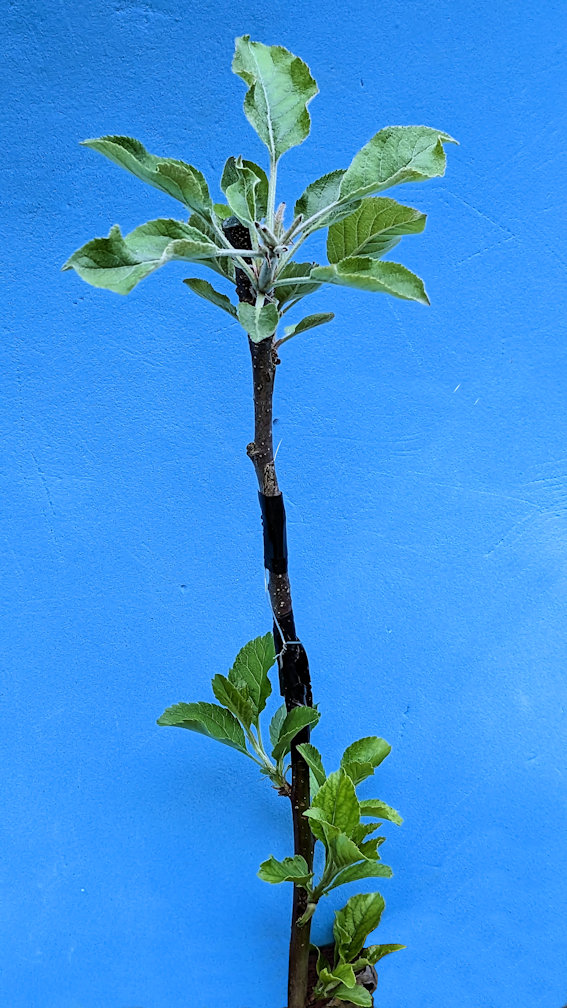
Graft that took
In this case, the rootstock sprouts from below the graft should be removed. They are only competing with the intended growth.
Now, an example where the graft failed. The growth from the graft has dried and shriveled up. There is no point waiting for anything else from the top, it’s dead.
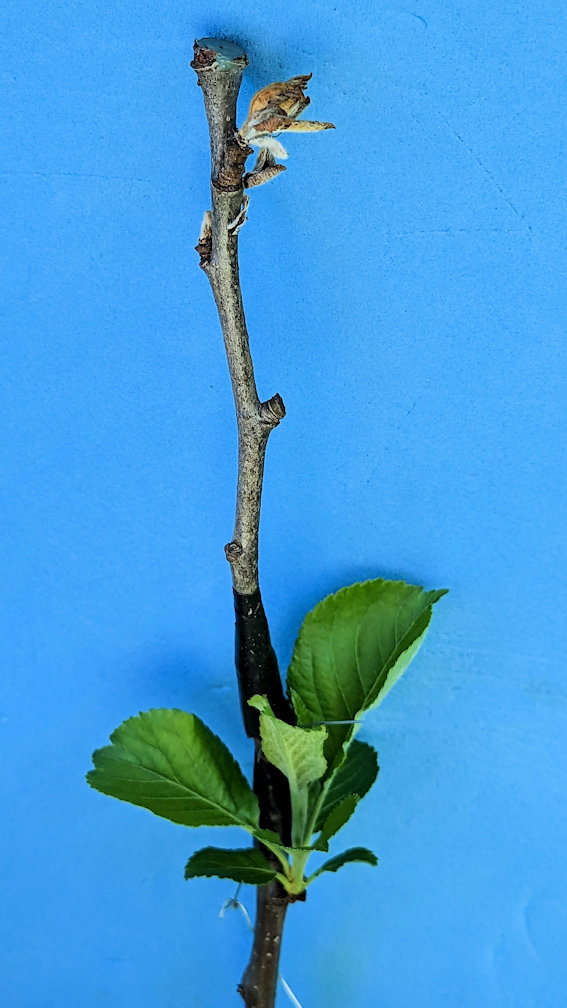
Graft failed
In this case, the healthy leaves from below the graft are the rootstock’s bid for life. If you break them off, you’re taking away it’s only chance.
Shoots like this are candidates for summer bud grafting, the “second chance”. If there are multiple, breaking off all but one will make it more likely that one will be big enough by July.
If you have a fruit tree that dies to the ground, the roots will often put up new shoots. If the original tree was grafted, as is usually the case, those rootstock sprouts will not produce good fruit. However, you can bud graft onto those root spouts. The top that re-grows from your bud grafts will have the same kind of fruit as the bud grafts came from.
It’s a short step from this to starting new trees from root sprouts. Fruit trees often put up shoots from their roots, whether the original tree died down or not.
You can transplant root sprouts, and then graft on them later, but bud grafting allows you to shortcut the process. You can bud graft onto these sprouts the same summer they appear. Then, the following winter, transplant the sprouts. The bud graft will be growing into a new top as the roots develop.
Sometimes fruit trees produce thickets of root sprouts, and it may be hard to tell which of them will have enough of their own roots by the following winter. However, bud grafting is so easy, you can just put buds onto lots of them, and later use only the best.
Keep in mind that a “sprouty” kind of roots may well produce a tree whose own roots are similarly prone to sprouts. However, a vigorous fruitful top may “tame” the roots, and reduce their tendency to sprout.
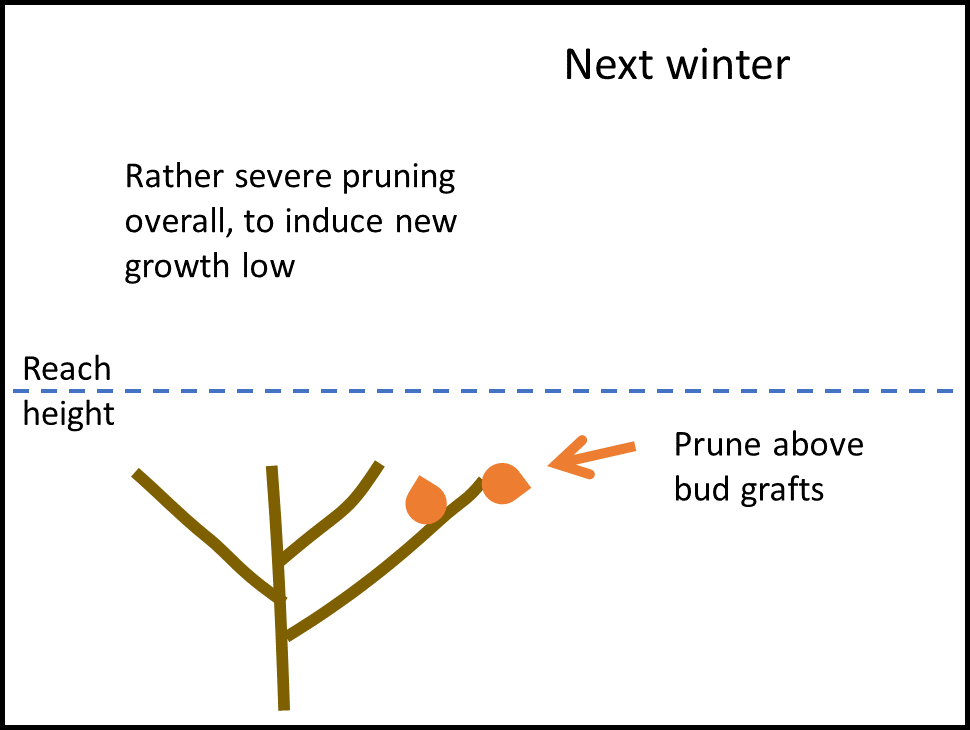
Renewing an entire tree
Returning to the story of creating a ‘Shiro’ plum tree from a useless hedgerow thicket: You can change the whole top of a tree into another variety. You can skip the step of trying spring grafts, and just give the original tree a rather severe pruning the winter before.
By next summer, it will have lots of new shoots, good to bud graft onto. All this will be easier if you have the new sprouts low enough you can work them while standing on the ground.
Maybe it’s summer, the time for bud grafting, but you did not cut back your tree the winter before. You can telescope the process.
Even dwarf trees may have most of their strong growth high up, too tall to easily reach. The following method spreads the renewal process over two years. However, it takes only a small amount of original budwood, it lets you get used to bud grafting, and it means you will not have to work high up in the canopy of your tree.

Existing tree
Most trees have at least a few low twigs, suitable for bud grafting. However, these may be in the shade of the canopy. By this method, they will no longer be in the shade by the following year, when it’s time for them to grow.
Prune back
Next winter, when it’s time to prune off above your bud grafts, give the whole tree a rather severe pruning.
This opens up the canopy for your bud grafts to grow. It also induces the rest of the tree to put out new strong shoots from all the cut ends, ideal for bud grafting onto.
Strong growth
The vigorous shoots from your first bud grafts are now the source of buds to graft on all the new stock shoots.
Multiply the buds
The following winter, treat these the same as your original bud grafts. Prune off above them. Since they are on strong stock shoots, they will grow vigorously.

Re-growth
As the canopy re-grows, it will be the variety you bud grafted on.
Aside from renewing a single tree, you can use bud grafting like this to increase a variety you only have a small amount of. Soon, you could have enough for an entire orchard. It may be hard to believe until you do it, but each cycle multiplies buds by a factor of ten, twenty, or even more.
Below is a photo of an apricot twig from a bud graft, a single pinhead sized bud. By mid-June, the resultant shoot already has 50 buds (this is only the top of that shoot). So, multiplied by a factor of fifty.

Shoot from bud graft
In renewing a tree, you do not need to stop at only one new variety. You can treat each branch as in the diagrams above, and have multiple new varieties. You can try combinations you’re not sure are graft-compatible. If not compatible, the bud grafts will die, but you have only made small scars in the stock twigs.
One thing to be aware of is that growth from a bud graft, after a few years, may “blend in” so well you can’t tell it from the rest of the tree. So, you might want to organize your work, grafting all buds of one variety on one branch of the stock, to keep track of where they are.
You might want to put a paint spot at the base of each bud graft shoot in its first year of growth. Then, in future years, you can tell and not prune it off by mistake.
Add a pollenizer
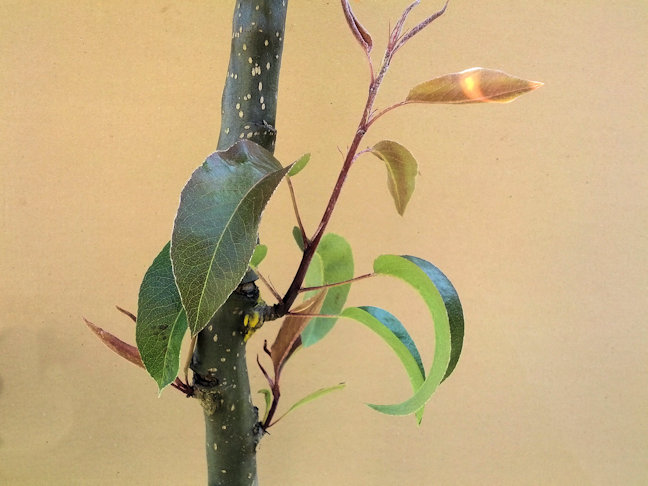
Bud grafting is a good way to add a pollenizer, if your tree needs one. Below is an example, a red-leaved ‘Hollywood” plum bud grafted as a pollenizer onto ‘Howard Miracle’.

‘Hollywood’ as pollenizer
The ‘Hollywood’ bud was induced to grow by the gouge-above method. In the years up to this one, pollen was provided by a handful of flowering twigs from a distant plum tree, hung in a jar of water in the branches. In following years, the ‘Hollywood’ branch bloomed out and provided pollination for the rest of the tree, as well as producing a sample of its own plums.
New trees
Some friends of mine grew a seed from a ‘Granny Smith’ apple, to see what the progeny would be. It turned out as a hard, sour, bitter little greenish-yellow crab apple.
Seedling from ‘Granny Smith’
Seedling fruit is like mongrel dogs. You have no idea of the father.
This means that if a seedling apple tree comes up, the fruit is most likely not going to be good. However, while it’s still a sprout, you can bud graft onto it. The growth that comes from the bud graft will be the same variety as the bud graft came from. So, you can use seedling fruit trees as the roots for new trees.
Seedling trees usually grow to large, or “standard” size. To get a dwarf or semi-dwarf tree, you graft onto special rootstocks, which you buy. All too often, when you order these from a nursery, what arrives is too small to graft onto as-is. However, if you plant it in good conditions, it may well be big enough by summer to bud graft.
Trialing new varieties
To get new fruit varieties, you have to give seedlings a chance. But you will need to test a lot of them to find the winners. Here, bud grafting can help. You don’t have to grow each seedling up to a full-sized tree, which takes many years and lots of space.
You can slice one bud off a seedling and graft it onto a mature tree. Within a few years, you can get that bud to grow out and give you a sample of its fruit. Of itself, this is not enough to determine a world-class new variety, but you can eliminate a lot of duds.
You could use other styles of grafting, but a seedling may well be big enough to spare a bud or two the first summer after it germinates. Since you’ve only done this minimal damage, the seedling tree is still there for future use.
And always be sure the label your grafts!
Tape labels on

2023-05-27 at 02:16
WOW! Thank you! Another killer article!
2023-05-27 at 14:32
Very straight forward and informative. Great
2023-07-10 at 04:39
Love the detailed, close-up photos. Excellent and comprehensive article.
2023-07-12 at 11:00
I used to teach bud grafting at the Home Orchard Society. This is great info. I would add that watering the tree beforehand helps as well. I would water them twice. The latter time was 45 minutes before budding.
2023-07-13 at 08:18
I recall that Home Orchard Society never did their bud grafting classes till August. Yes, watering a tree will sometimes work as a last ditch effort, when the bark is about to go dormant. But if you bud graft the second week of July, you don’t have to worry about that. As I say throughout this blog, let’s keep things Easy!
2023-07-13 at 08:52
Yes, HOS started budding classes the first week of August. I am trying it your way, and I am excited to see if it works better. When the bark is ready, you can hear an audible snap, when you cut through it with your knife. In August, it wouldn’t work unless you watered it first. I bud grafted yesterday and today. This will be interesting to see the results. I appreciate your blog.